What You’ll Create
Here’s what you can make after following this guide:
Generated Image
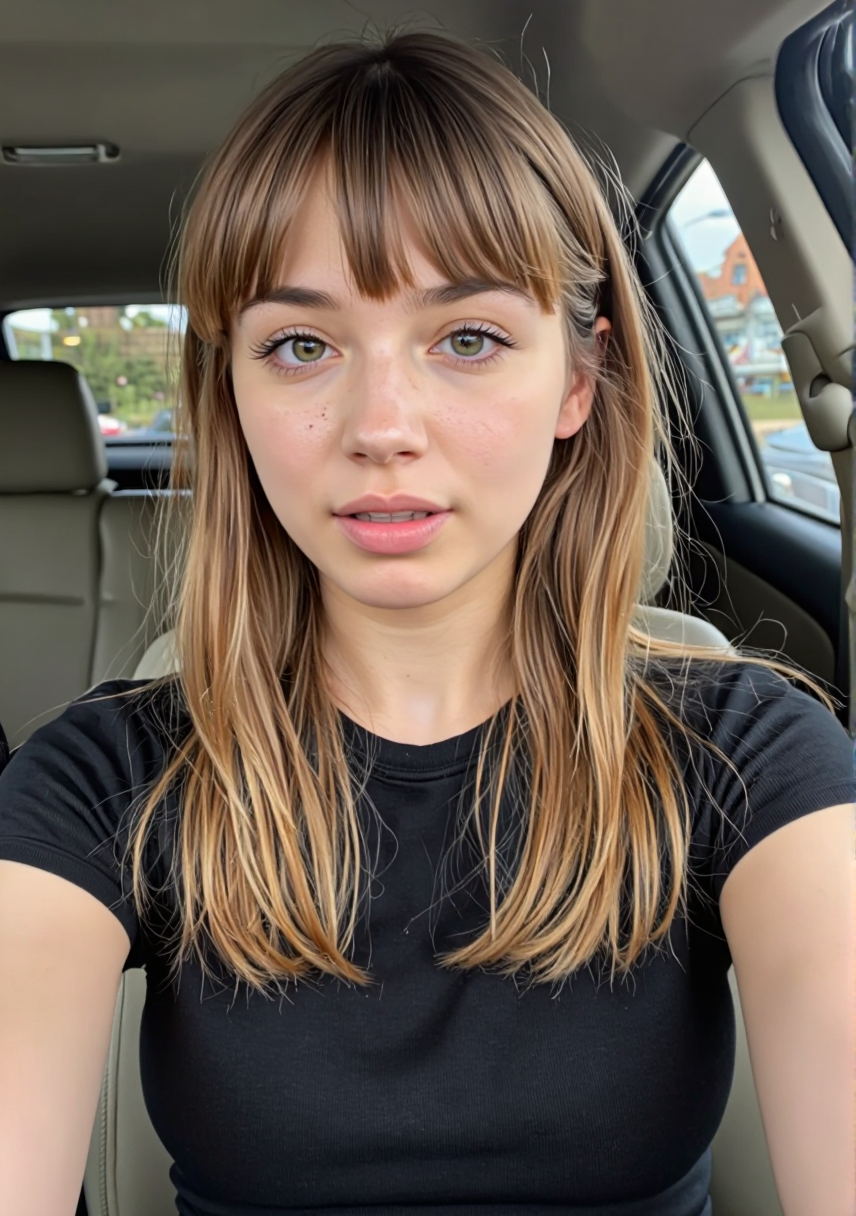
💭 Image Prompt
Generated Video
🎬 Motion Prompt
Can your computer run this?
- Windows + NVIDIA GPU (8GB+ VRAM): ✓
- Mac M1/M2/M3 (16GB+ RAM): ✓
- Windows + AMD GPU: ✗
- Mac Intel: ✗
Time needed: ~45 minutes setup, then 5-10 minutes per video
Quick Start Checklist
-
Download ComfyUI Desktop
- Windows: ComfyUI for Windows (NVIDIA)
- Mac: ComfyUI for Mac (M1/M2/M3)
-
Download these models
- □ Flux/RedCraft model (~11GB)
- If you run into an FP8 error on Mac, also grab “Pruned Model nf4 (6.46 GB)” from the same page (GGUF format)
- □ LTX Video model (~6GB)
- □ T5 XXL text encoder (4.89 GB)
- □ CLIP text encoder (246 MB)
- □ VAE (168 MB)
- □ Flux/RedCraft model (~11GB)
-
Put models in correct folders
- □
models/unet/RedCraft_RealReveal5_ULTRA_15Steps_fp8_pruned.safetensors - □ (Optional for Mac)
models/unet/redcraftCADSUpdatedMay11_reveal5SFWULTRA.gguf - □
models/checkpoints/ltxv-2b-0.9.6-distilled-04-25.safetensors - □
models/text_encoders/t5xxl_fp8_e4m3fn.safetensors - □
models/clip/clip_l.safetensors - □
models/vae/vae.safetensors(rename fromdiffusion_pytorch_model.safetensors)
- □
-
Run the workflow
- □ Download Workflow file
- □ (If using the GGUF model) Download GGUF workflow file
- □ Open ComfyUI and load the workflow
- □ Write your text prompt for the image
- □ Write your motion prompt for the video
- □ Click “Queue” and wait for your video
What This Can (and Can’t) Do
This Workflow Can:
- Create short videos (5-6 seconds) at 24 FPS
- Add subtle, realistic motion to still images
- Create camera movements like pans, tilts, and zooms
- Add environmental effects like wind in hair or leaves moving
- Generate videos faster than real-time on high-end hardware
This Workflow Can’t:
- Create complex actions or movements
- Generate multiple scenes or scene transitions
- Make people run, dance, or perform complex activities
- Create Hollywood-quality special effects
- Produce videos with perfect frame-to-frame consistency
Detailed Step-by-Step Instructions
1. Install ComfyUI Desktop
Download the appropriate version for your system:
- Windows: Use the NVIDIA version
- Mac: Use the Apple Silicon version
Run the installer and follow the prompts. When asked about GPU selection:
- On Windows: Choose “NVIDIA GPU”
- On Mac: Choose “MPS” (Metal Performance Shaders)
2. Download Required Models
You need five files for the complete workflow:
| Model | Purpose | Size | Download Link | Save To |
|---|---|---|---|---|
| RedCraft RealReveal5 ULTRA | Image generation | ~11GB | Download | models/unet/ |
| LTX Video model | Video generation | ~6GB | Download | models/checkpoints/ |
| T5 XXL text encoder | Text understanding | 4.89 GB | Download | models/text_encoders/ |
| CLIP text encoder | Text understanding | 246 MB | Download | models/clip/ |
| VAE | Image encoding | 168 MB | Download | models/vae/vae.safetensors |
To find your models folder:
- Open ComfyUI
- Click the three dots in the top-right corner
- Select “Open Models Folder”
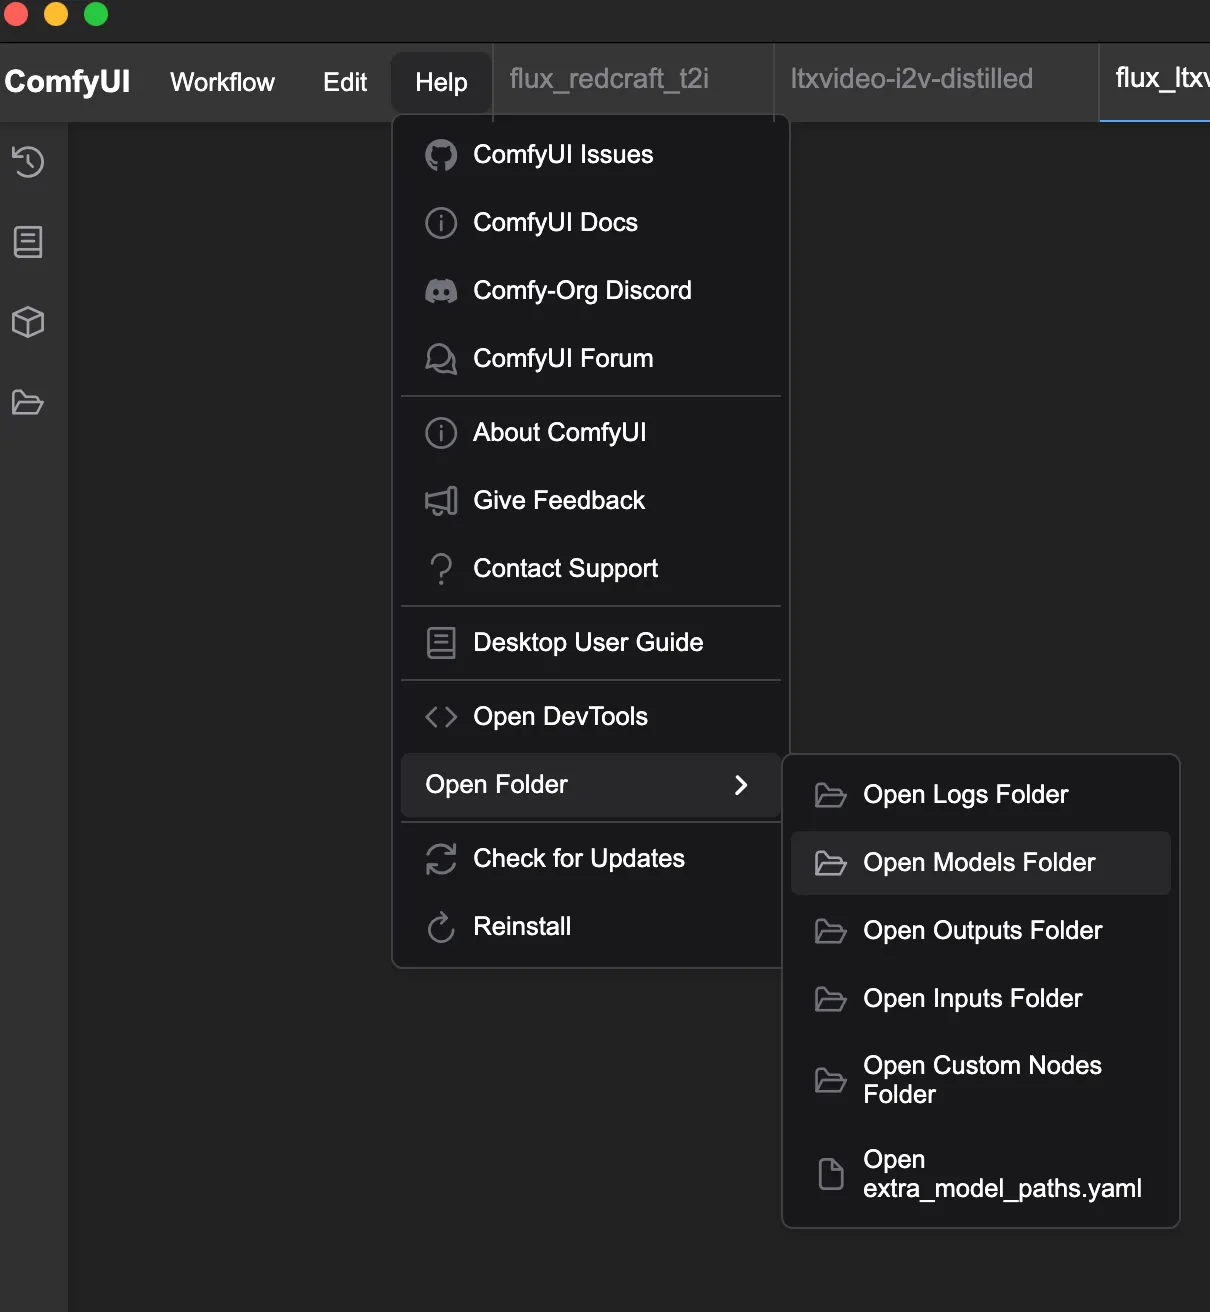
Create the necessary subfolders if they don’t exist, and place each file in its correct location. For the VAE, rename diffusion_pytorch_model.safetensors to vae.safetensors.
3. Download and Run the Workflow
The easiest way to start is with a complete workflow that combines image and video generation:
-
Download the combined workflow file
-
In ComfyUI, click “Workflow” -> “Open” and select the downloaded workflow file
-
If you see missing nodes errors:
- Click “Manager” → “Install Missing Nodes”
- Wait for installation to complete
- Restart ComfyUI
-
Configure your prompts:
- In the “Flux Prompt” node, enter your image description
- In the “LTX Motion Prompt” node, describe the movement you want
-
Click “Queue” to run the workflow
-
Find your video in the
outputfolder beside your ComfyUI models folder
4. Creating Effective Prompts
For Image Generation (Flux):
Describe your subject clearly and specifically. Include details about:
- Who/what is in the image
- Style (realistic, cartoon, painting, etc.)
- Lighting and environment
- Clothing and appearance details
- Quality indicators (high quality, detailed, etc.)
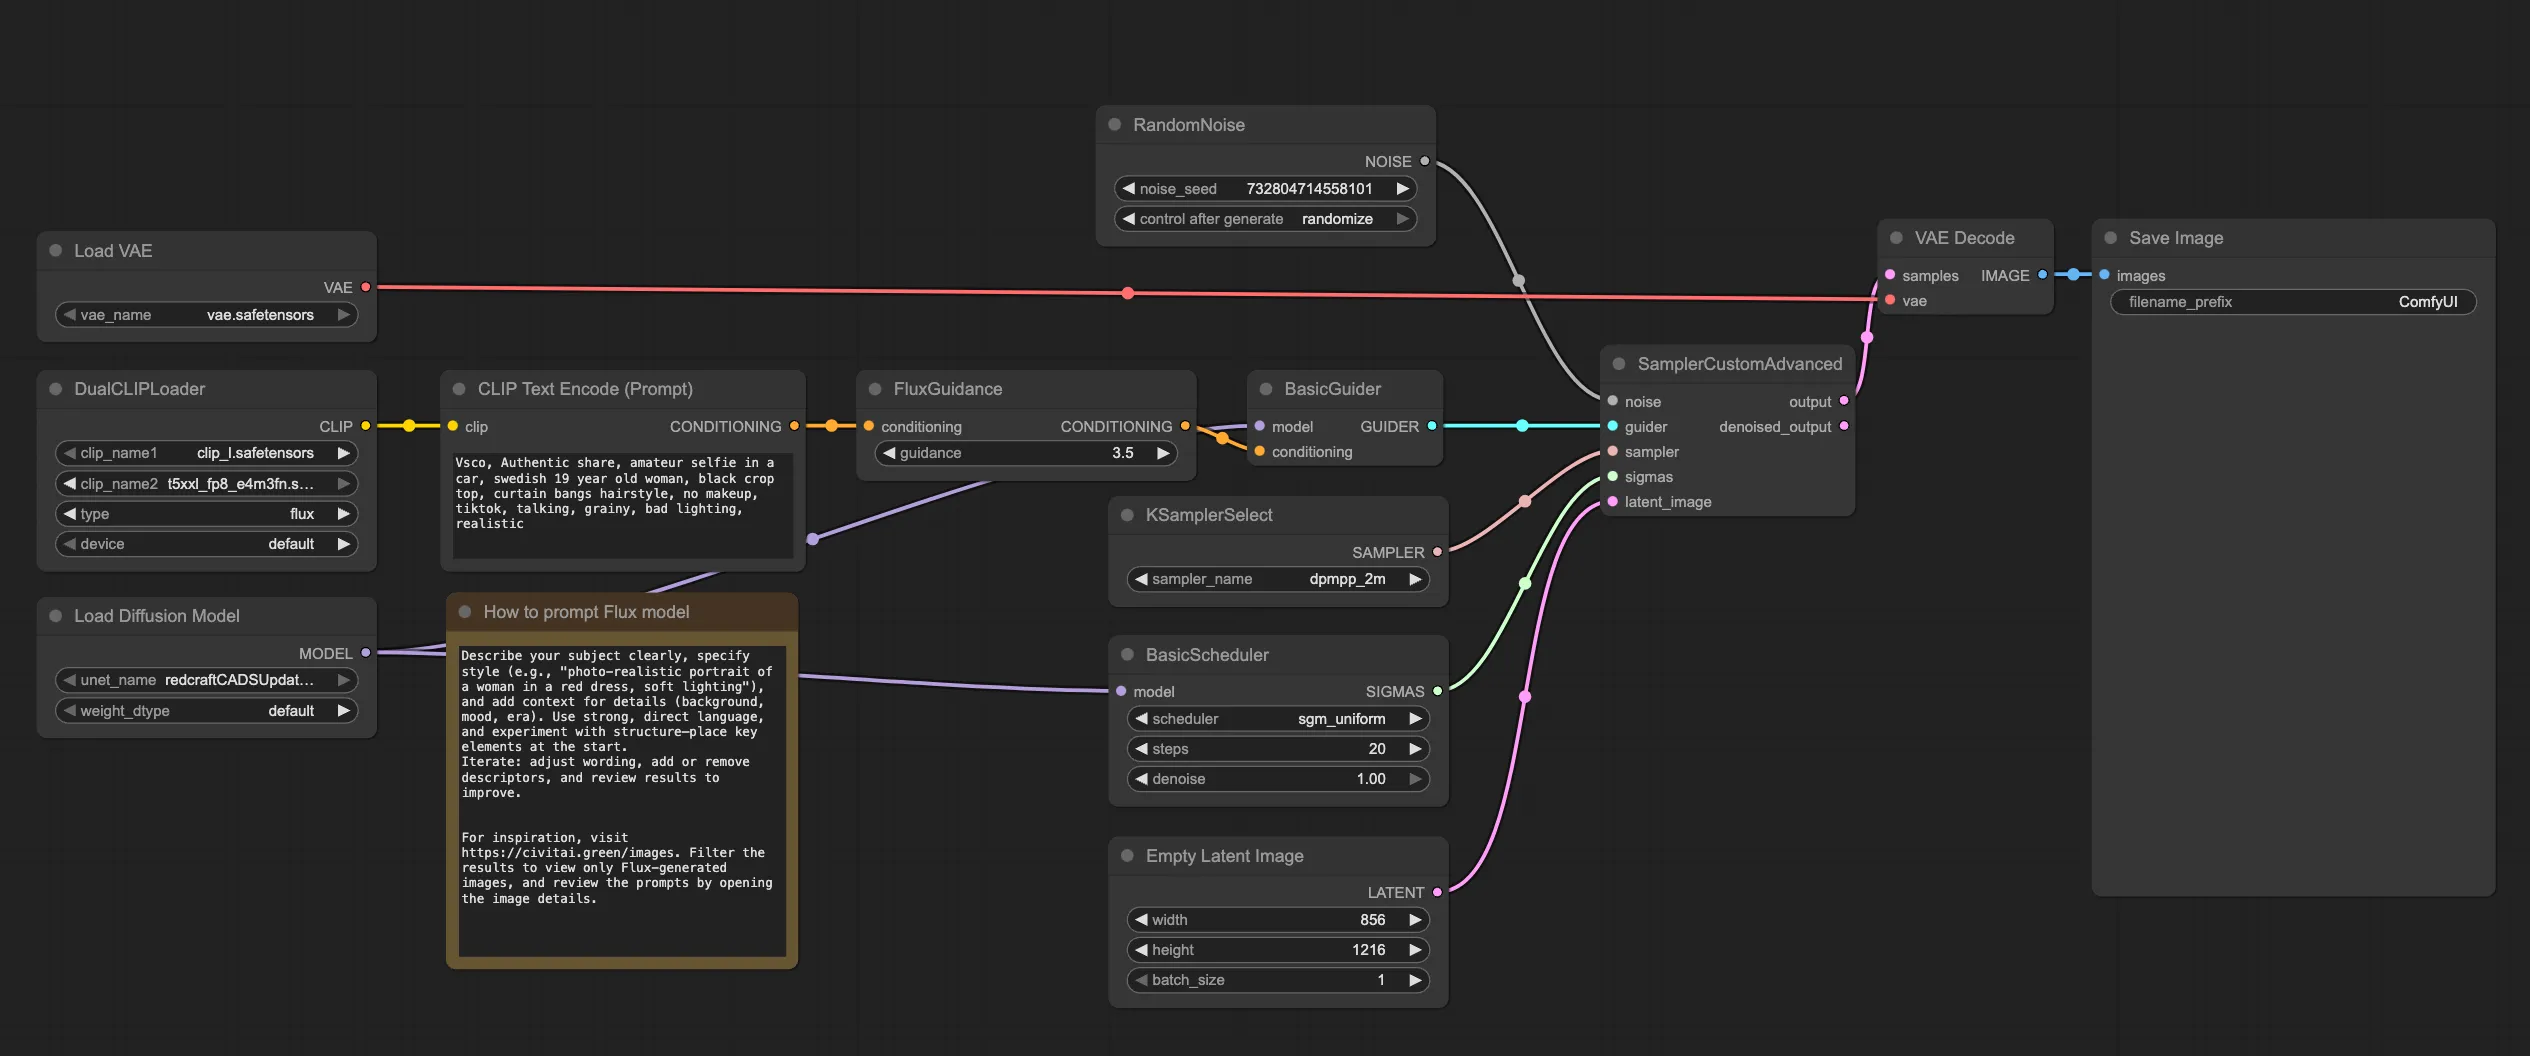
Example: "Vsco, Authentic share, amateur selfie in a car, swedish 19 year old woman, black crop top, curtain bangs hairstyle, no makeup, tiktok, talking, grainy, bad lighting, realistic"For Video Generation (LTX):
Describe the motion you want, including:
- Starting position/pose
- Any subject movements (subtle head turns, smiles, etc.)
- Camera movements (pans, zooms, etc.)
- Environmental effects (wind in hair, etc.)
- Overall feel (handheld, cinematic, etc.)

Example: "Vertical phone selfie. A young woman sits casually in the driver's seat, softly smiling at the camera. She gently tilts her head, briefly looks down with a shy expression, then lifts her eyes back up, her smile widening naturally into a playful, slightly bashful grin. The handheld camera moves lightly, giving a spontaneous and genuine TikTok feel—real-life footage."
Troubleshooting Common Issues
Error with Float8_e4m3fn dtype on Apple Silicon (MPS)
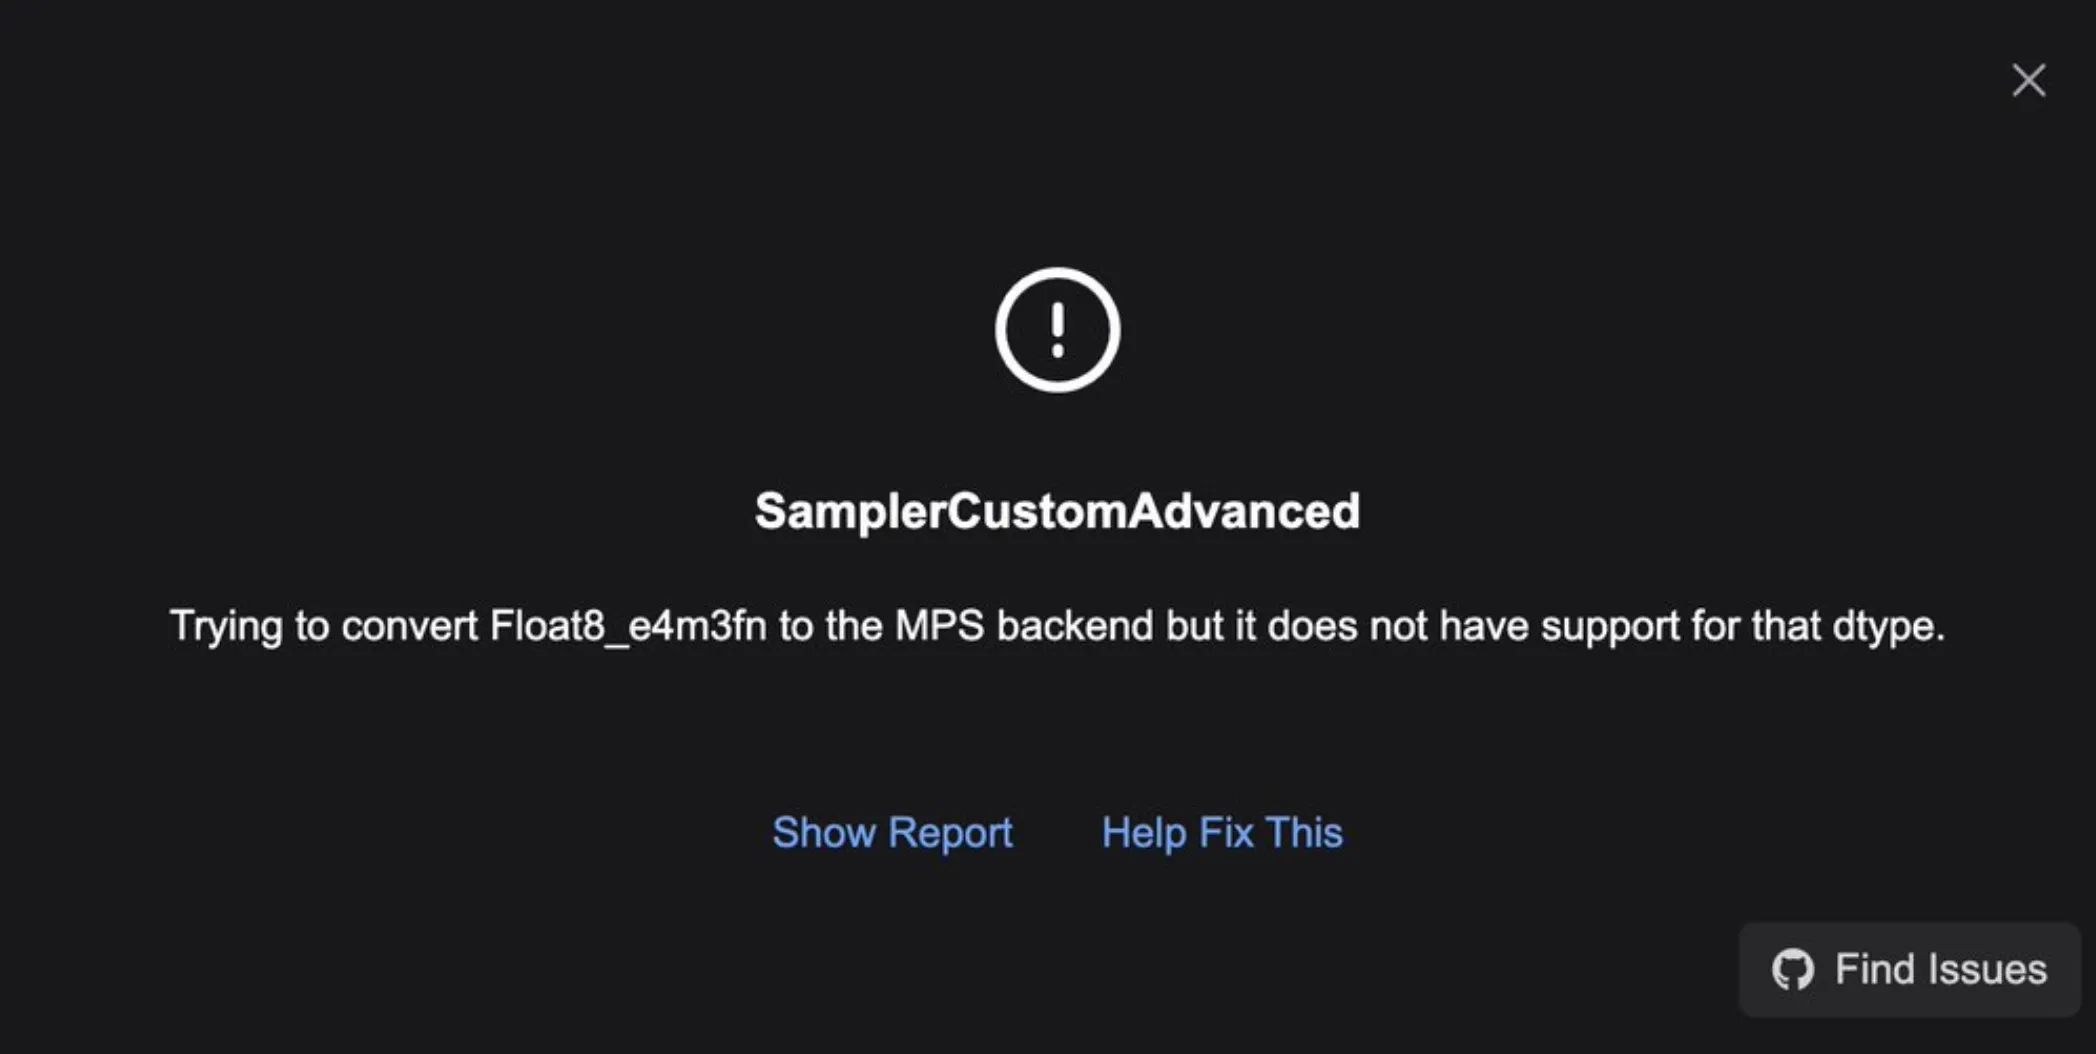
Problem: Error message about “Float8_e4m3fn dtype not supported on MPS”
Solution:
- Download the “Pruned Model nf4 (6.46 GB)” file from the RedCraft page and place it in
models/unet - Load the GGUF workflow and install any missing nodes via the Manager
- If the error persists, install the FP16 version of the T5 text encoder instead of the FP8 version
- Refresh ComfyUI and select the FP16 version in the “DualCLIPLoader” node
Model Not Found Errors
Problem: Red error text mentioning missing models or “Model not found”
Solution:
- Check that your files are in the exact paths listed in Section 2
- Ensure filenames match exactly (case-sensitive)
- Restart ComfyUI after adding models
- If using a workflow, make sure model selections match your filenames
Out of Memory (OOM) Errors
Problem: “CUDA out of memory” or other memory errors
Solution:
- Reduce image resolution (try 512x768 instead of higher)
- Reduce video frames (65 frames = ~2.7 seconds at 24 FPS)
- Close other applications
- On Windows, use the
--lowvramflag when starting ComfyUI - On Mac, be patient - the first run compiles optimizations
Black or Blank Video Output
Problem: Generated video shows only black frames
Solution:
- Check that the T5 text encoder is installed correctly
- Make sure your motion prompt isn’t empty
- Try a simpler motion description
- Generate a new image and try again
Video Flickers or Shows Artifacts
Problem: The generated video shows flickering or motion inconsistencies
Solution:
- Use simpler camera movements (“gentle pan” instead of complex movements)
- Add “consistent lighting, consistent appearance” to your motion prompt
- Reduce the CFG Scale value in the LTX node (try 5-7 instead of higher)
- Generate a longer video and trim the first/last few frames
Going Further: Advanced Techniques
Once you’re comfortable with the basic workflow, try these improvements:
Better Camera Movements
Start with simple camera movements that work well:
- “Camera slowly pans from left to right”
- “Gentle zoom in on the subject’s face”
- “Slight handheld camera motion for realism”
Avoid complex movements like “camera circles around subject” which often cause artifacts.
Subject Motion Guidelines
The most reliable subject motions are:
- Subtle facial expressions (smiles, blinks)
- Slight head turns
- Hair movement
- Environmental effects (leaves rustling, water rippling)
Avoid asking for walking, hand gestures, or complex body movements.
Workflow Variations
For more flexibility, try these workflow variations:
- Image-only workflow - Just generate the image
- Video-from-existing-image workflow - Use your own images
How It Works (For The Curious)
If you’re interested in the technical details, here’s a simplified explanation:
The Two-Stage Process
-
Text → Image (Flux)
- Your text prompt is processed by text encoders (CLIP and T5)
- The Flux model transforms random noise into an image matching your description
- Each “step” refines the image from noise to a clear picture
-
Image → Video (LTX-Video)
- Your motion prompt describes how things should move
- LTX uses the initial image and creates new frames showing motion
- The frames are combined into a smooth video
Key Components
- Text Encoders: Convert your text into a format AI can understand
- Diffusion Models: Generate images by removing “noise” step by step
- VAE: Compresses images into a format the AI can work with
- Samplers: Control how accurately (but slowly) the AI follows your prompt
Resources for Learning More
- ComfyUI GitHub - Latest updates and documentation
- Flux Models - More Flux models to try
- LTX-Video GitHub - LTX documentation
Appendix: Complete Folder Structure
For reference, here’s the complete folder structure you should have:
models/
├── checkpoints/
│   └── ltxv-2b-0.9.6-distilled-04-25.safetensors
├── unet/
│   ├── RedCraft_RealReveal5_ULTRA_15Steps_fp8_pruned.safetensors
│   └── redcraftCADSUpdatedMay11_reveal5SFWULTRA.gguf
├── text_encoders/
│   └── t5xxl_fp8_e4m3fn.safetensors
├── clip/
│   └── clip_l.safetensors
└── vae/
    └── vae.safetensors
Each of these files plays a specific role in the image→video generation process.
Workflow Visual References
For clarity, here are the main workflow interfaces you’ll interact with:
Combined Text→Image→Video Workflow:
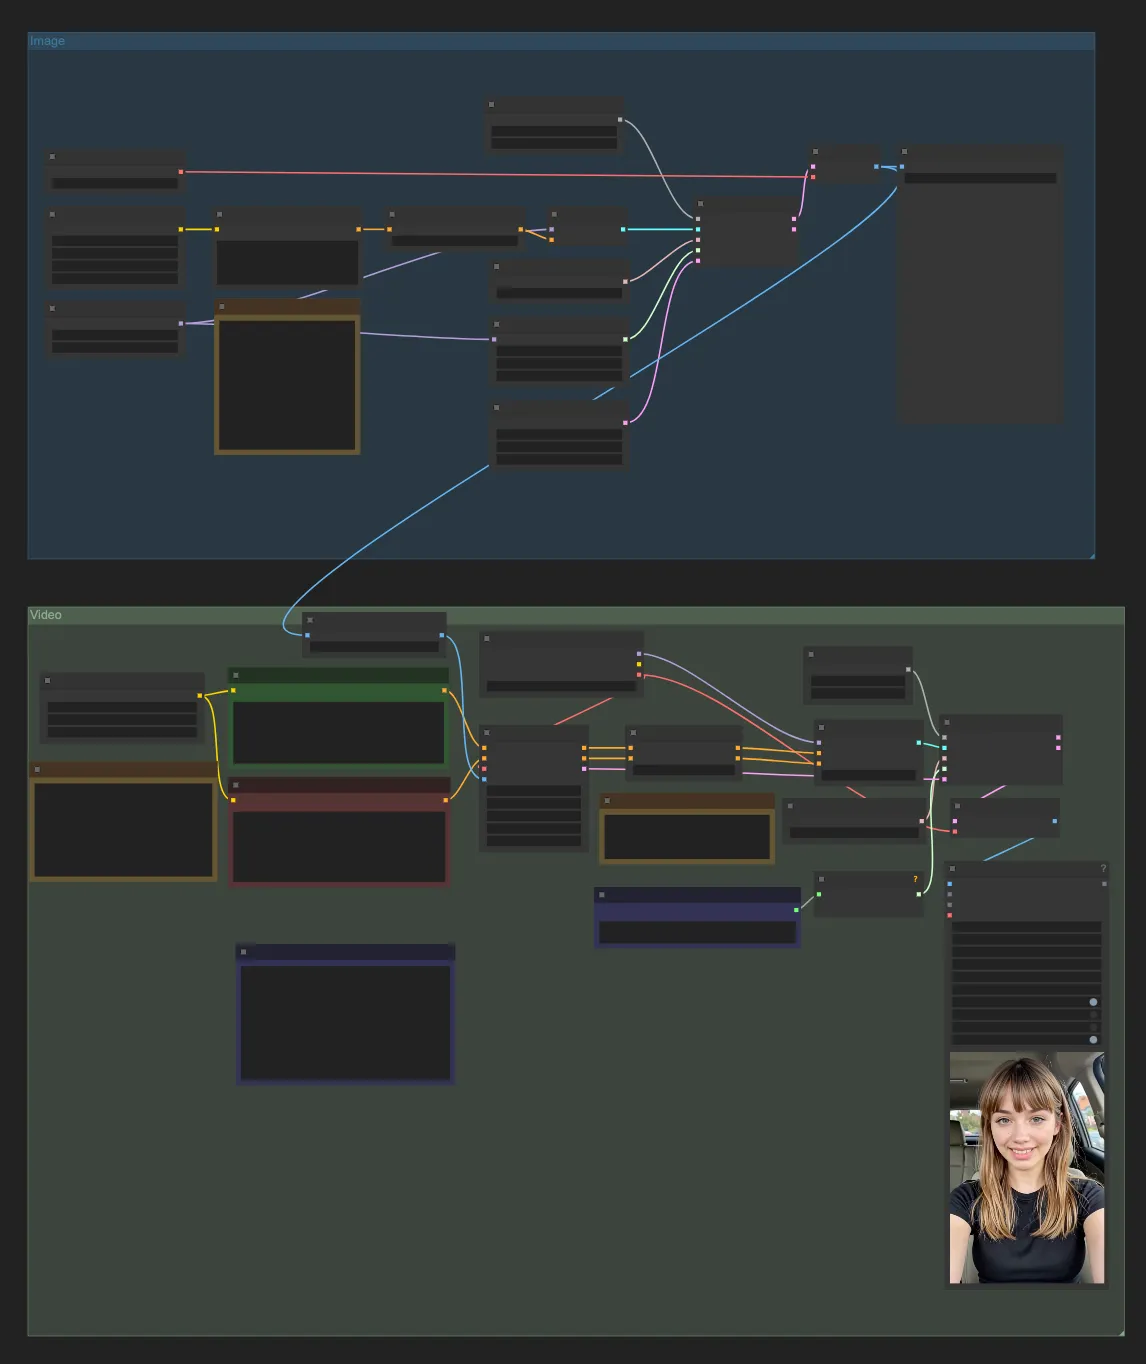
Image Generation Workflow:
Video Generation Workflow:
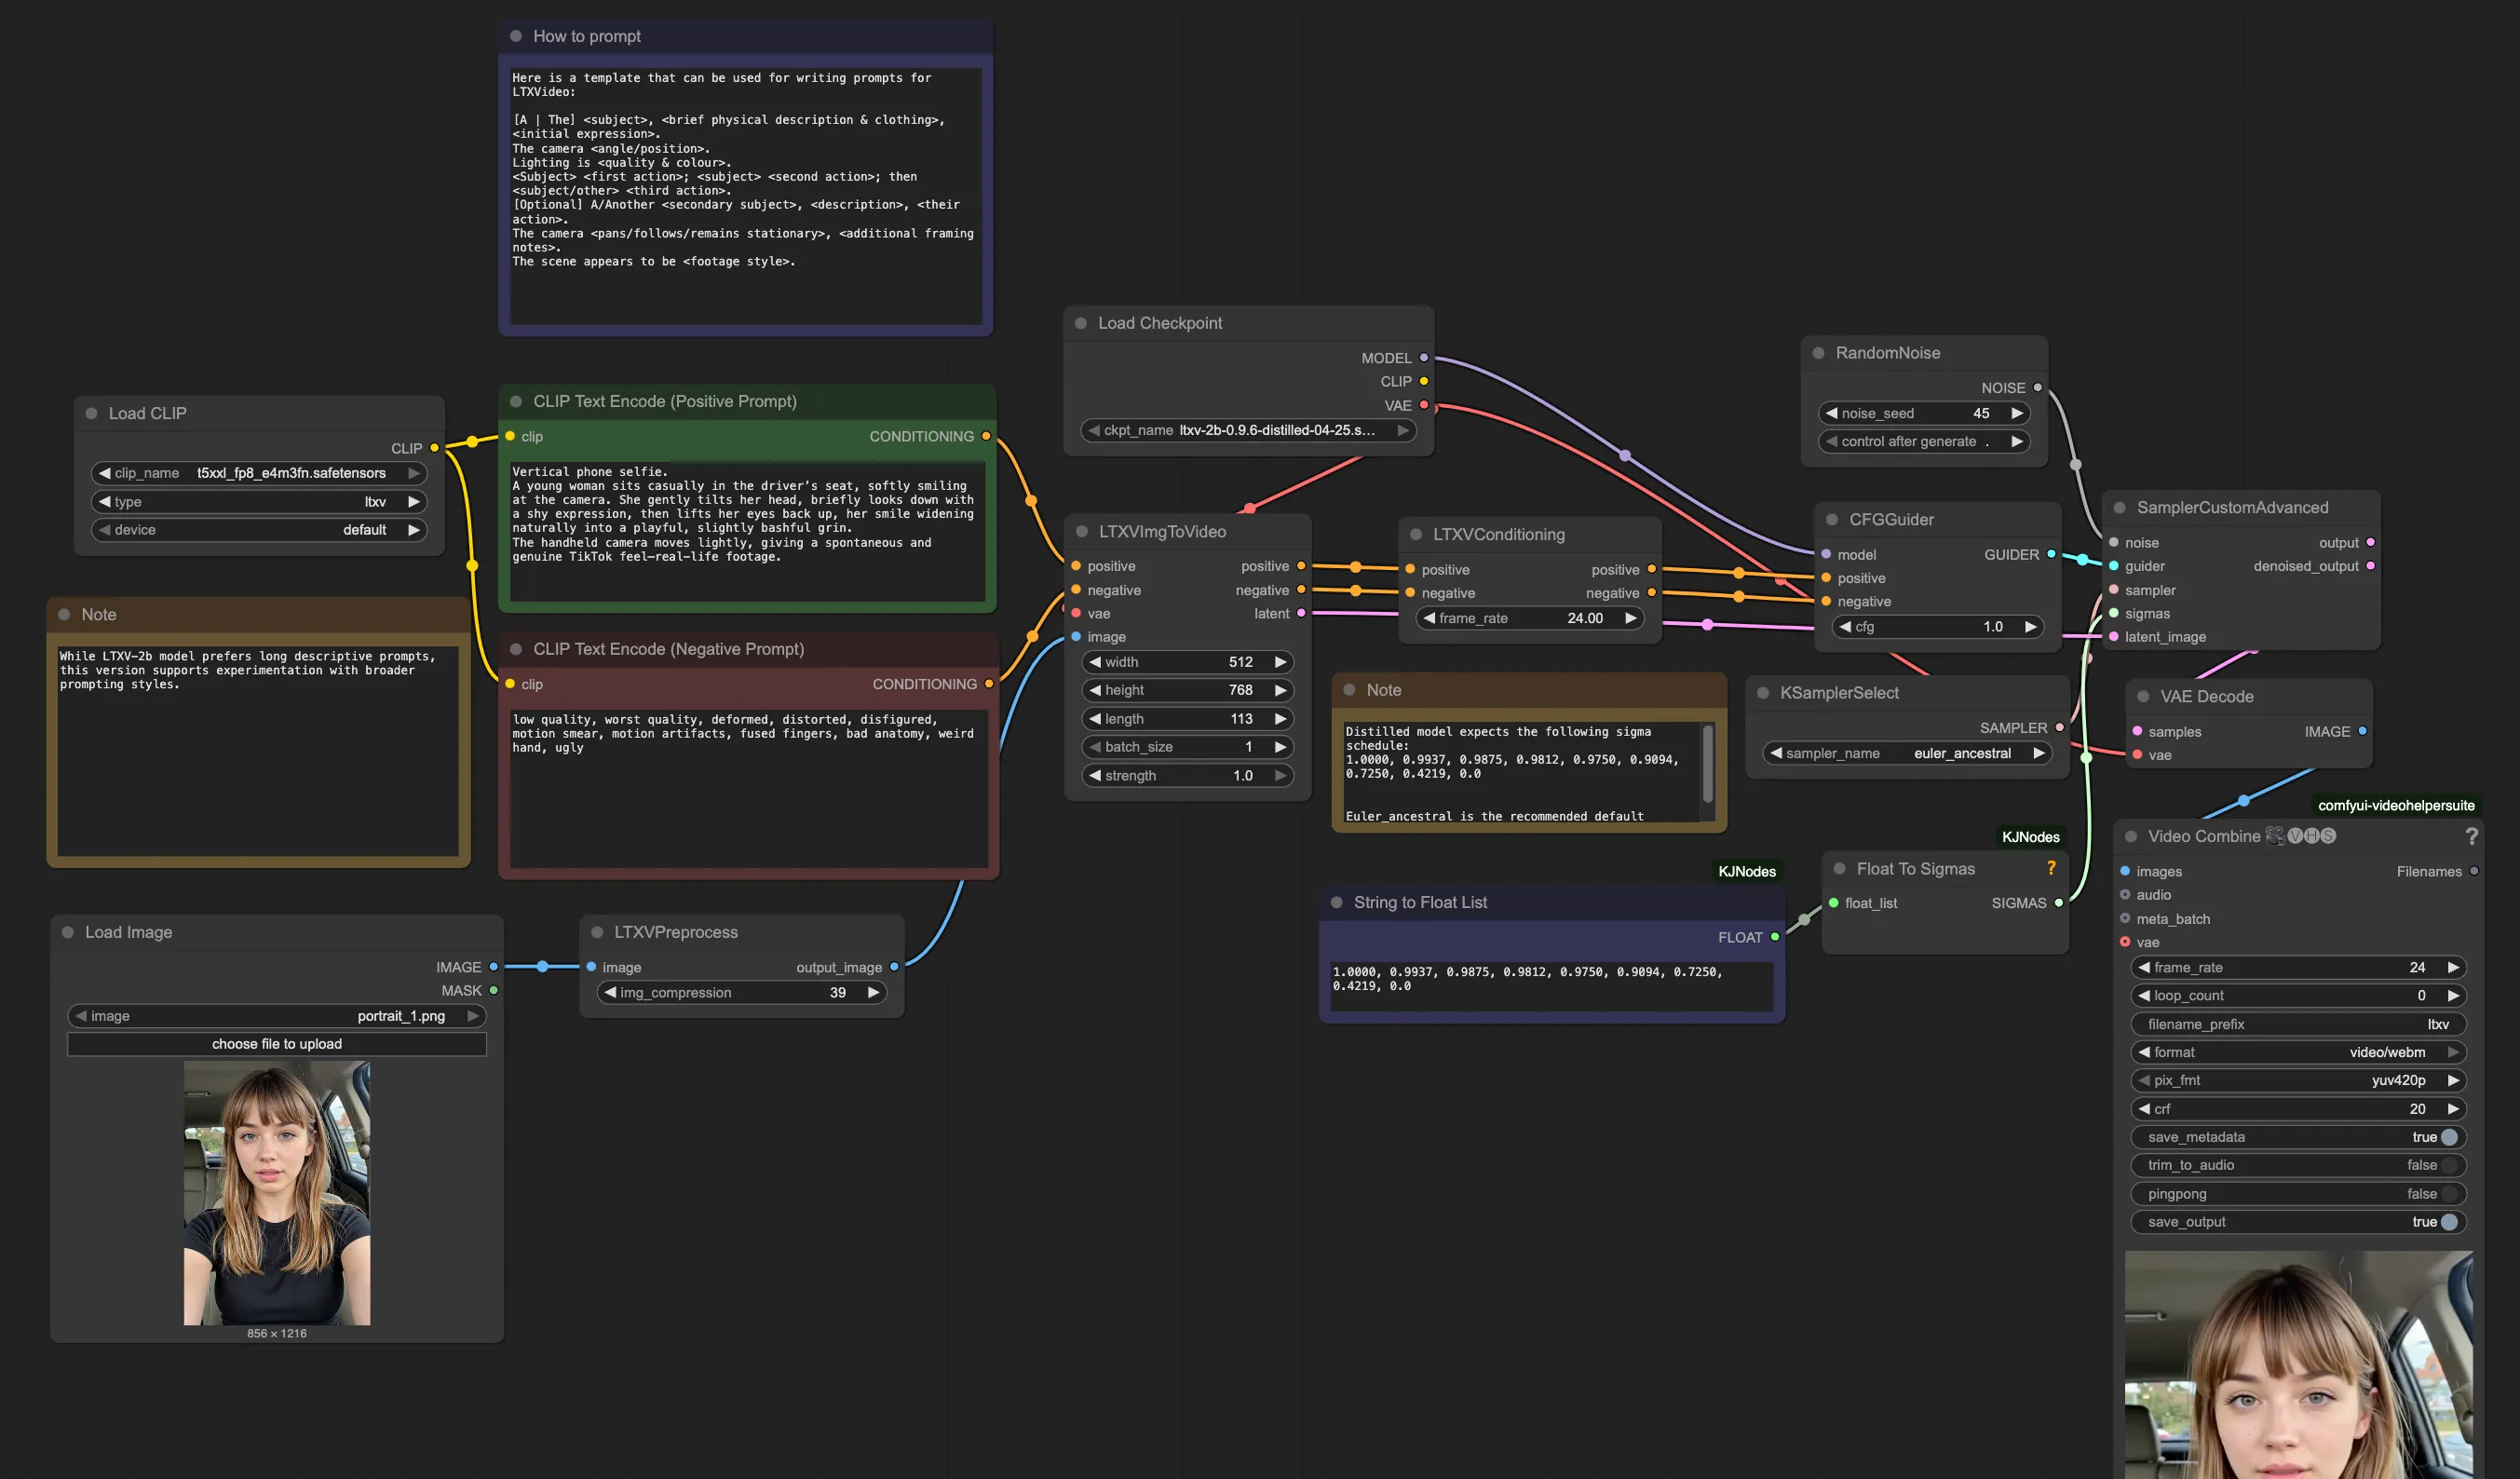
Use these as visual references when setting up your workflow.